Live Blog 3.0 for Journalists
What editors do
Editors: before reading further, please make sure you have read the chapter What contributors do, which details the process of creating content for publication in Live Blog. Once you are familiar with the workflow in that chapter, you will be ready to learn how to carry out the additional tasks which come with the editor role.
The core of an editor's work is reading, editing and approving content for publication. We'll come to that later in this chapter, in the section Publishing in Live Blog.
But first we'll look at how you create and configure live blogs; and how you manage users and teams.
Creating a live blog
To create a new live blog, in the Blog List view, click the blue CREATE BLOG button towards the top right corner of the screen.
![]()
Give your new blog a title.
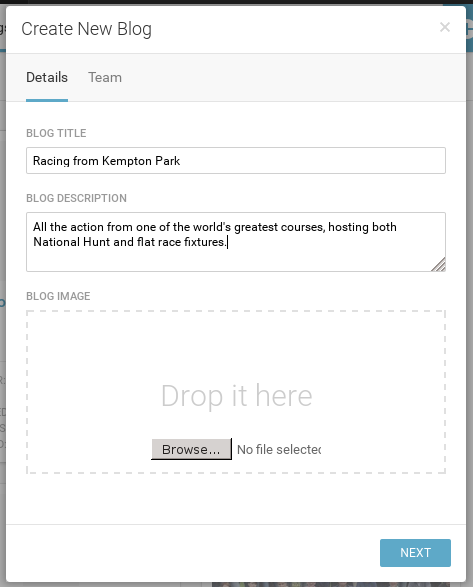
Optionally, you can add a description and an image, both of which will be displayed at the top of the timeline when it is published on your website. You can change these details in the blog's settings later if you wish. Please note that the image must be a minimum of 320x240 pixels in size.
Click NEXT and, if you know the names of anyone else on the system you would like to add to the team contributing to your new live blog, use the search facility to find and add them.
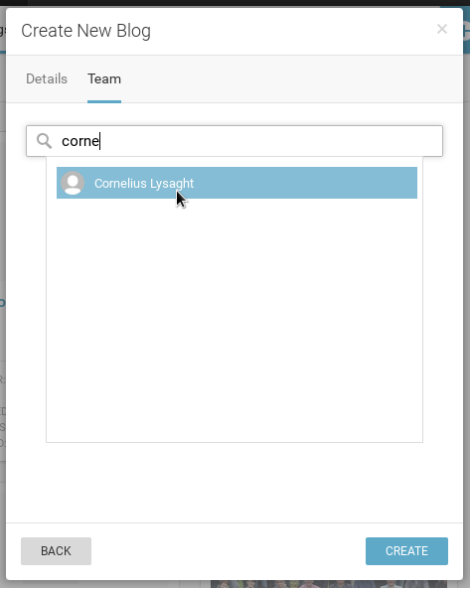
When you're finished, click CREATE. Your new blog will appear in the Blog List, and everyone who you have added to your team will be sent an email inviting them to participate in it.
Settings: General
You are the 'owner' of any blog which you create, and that gives you access to its settings. Click on the cog icon in the top right corner of the window to open them.
![]()
This brings you into the General tab of your blog's Settings.
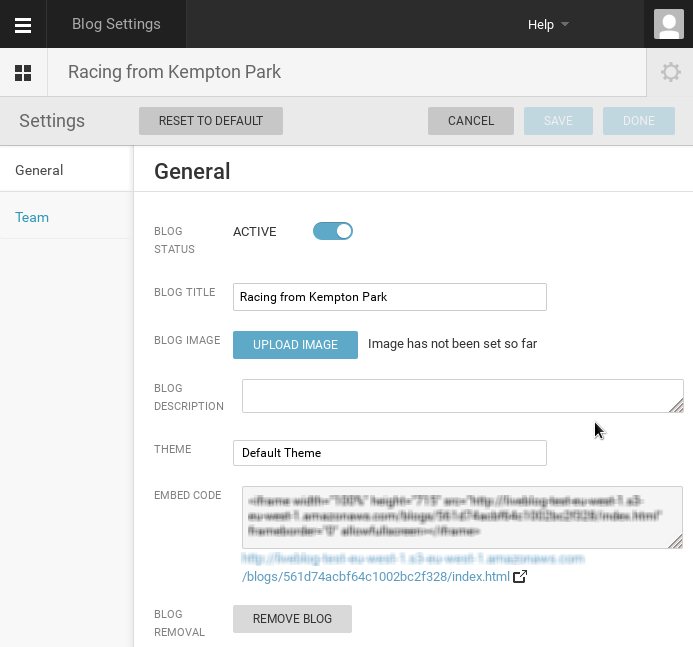
Here, you can change the title, description and image you set for your blog when you created it.
You can also change your blog's theme, if your system administrator has installed an alternative theme; set your blog to be inactive (offline); and even remove it completely from the system.
The embed code is what makes the magic happen. When this is copied into a page on your website, your live blog's timeline appears, refreshed automatically with every update.
Below the embed code in blue text is the direct link to your blog's published timeline, without the iframe tags which surround the full embed code. It's there for you to test. Click it, and the published timeline of your blog should open in another tab.
Settings: Team
Click on the Team tab to go to the other section of Settings.
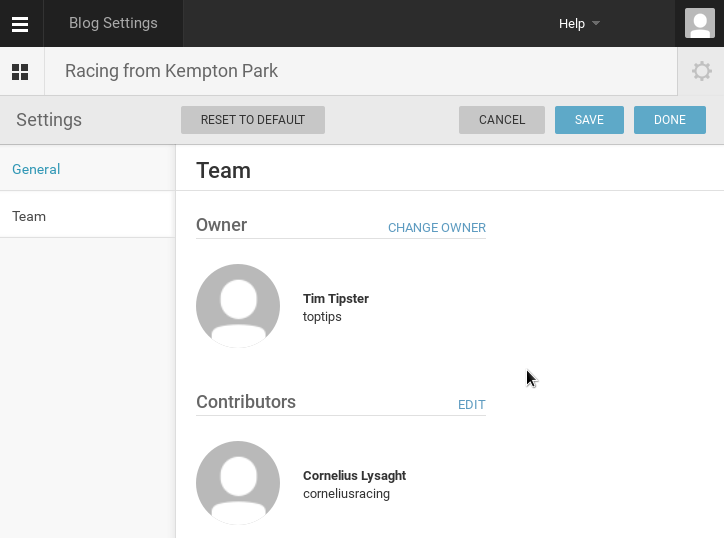
Here you will see yourself listed as the blog's Owner, and below you is a Contributors section containing the team members you've already invited. Click EDIT if you'd like to invite other people to join the team, or sack someone.
If at any point you would like to pass the ownership of the blog over to somebody else, click CHANGE OWNER and search for the person you would like to take over.
Reviewing and creating users
As an editor, you can see details of all the users currently on the system, and invite others to become Live Blog users.
Everywhere in Live Blog you will see a three-bar icon ![]() in the top-left corner of the screen. Clicking it brings out a sidebar, with links to Blog List and Users. Any time you need to return to the Blog List, click the three-bar icon again.
in the top-left corner of the screen. Clicking it brings out a sidebar, with links to Blog List and Users. Any time you need to return to the Blog List, click the three-bar icon again.
Click Users to show a list of all users on the system.
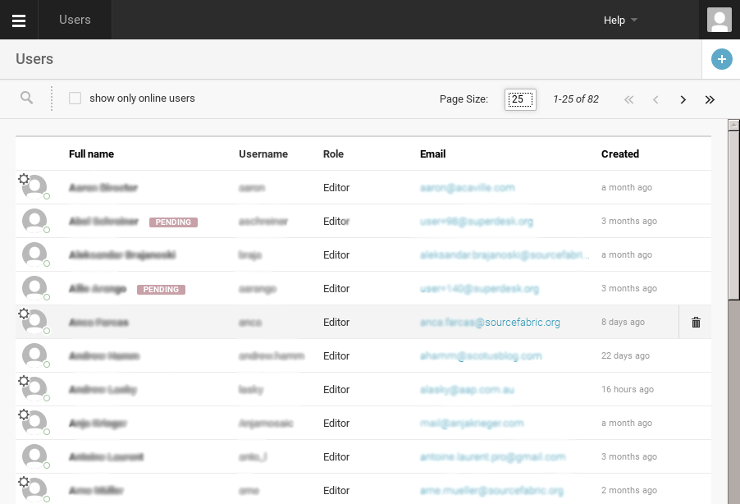
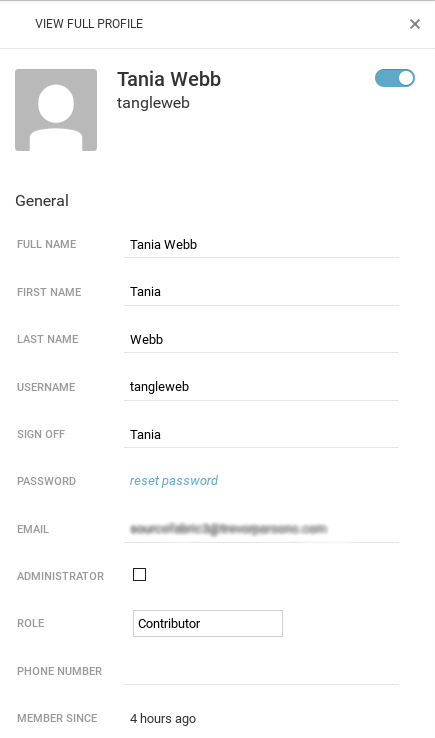
To see the details of a particular user, click anywhere on the row in which they are listed. A profile sidebar will appear on the right of the screen.
Click the cross in the top-right corner to hide the profile and concentrate on the Users list again.
You'll notice that the controls for navigating and searching through the Users list, located towards the top-right of the page, are pretty much the same as those for navigating the Blog List. In addition you can show only online users.
![]()
To sort the list of users by full name, username, role, email, or time created, just click the relevant column header.
![]()
Users who have been invited to join the Live Blog system, but who have not yet activated their account, are labelled as pending.
![]()
A dustbin icon appears to the right of each user as you mouse over the list.
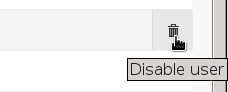
If you ever need to disable a user's account, click the dustbin icon and confirm. A label will appear next to the user's name indicating that the account is disabled. When you next mouse-over that user, a 'back arrow' icon will appear instead of the dustbin.
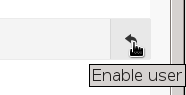
Click and confirm to re-enable the user's account.
Users will receive an email notification of any change in their status.
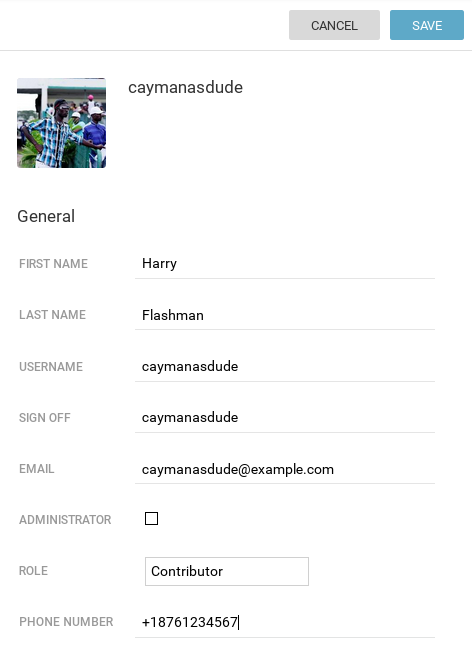
Creating a new user
In Users, click the blue 'plus' button ![]() towards the top right corner of the screen. A blank user form will appear as a sidebar. Fill it in with the details of the person you would like to add as a new user, taking particular care to ensure that the email address is correct. Fields marked with an asterisk are required. [Ignore the administrator checkbox]. Click on the avatar if you would like to upload an image for the user. Click the SAVE button to finish.
towards the top right corner of the screen. A blank user form will appear as a sidebar. Fill it in with the details of the person you would like to add as a new user, taking particular care to ensure that the email address is correct. Fields marked with an asterisk are required. [Ignore the administrator checkbox]. Click on the avatar if you would like to upload an image for the user. Click the SAVE button to finish.
You will see a notification to show that the user has been created. An email message will be sent to the new user. This contains a link which the new user should open to set a password and complete registration on the system.
Publishing in Live Blog
Publishing your own posts
You're already familiar with how to create content for publication in Live Blog, from reading the chapter What contributors do.
Contributors can only create and submit content, not publish it. As the additional PUBLISH button at the foot of the editor tab confirms, editors can, not surprisingly, publish their own posts.

When you click PUBLISH, the post is immediately published into the timeline.
Publishing other people's posts
The main task of an editor on a busy live blog is editing and publishing other people's work.
You have full control over all posts on any blog on which you are a team member. That's the power to edit, publish, unpublish and delete not only contributors' posts, but also posts by fellow editors and even the blog owner.
The Contributions tab is where you do most of this work.
If you happen to be working on your own material in the Editor tab, or retrieving a post from Drafts, you will be alerted to the arrival of new posts in the Contributions tab with a notification showing how many unread posts it contains.
![]()
An editor's view of the Contributions tab is similar to a contributor's view, except that every post features delete, edit and publish controls. The headings of any unread posts are highlighted.
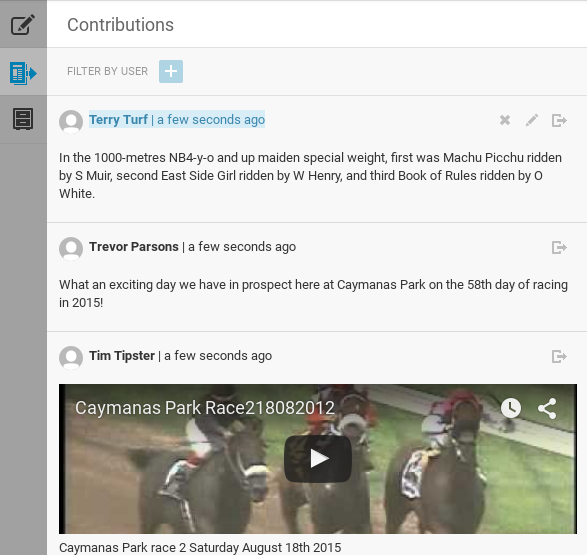
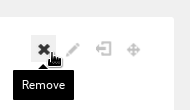
To delete a post, click the cross icon. You will be asked to confirm.
To edit a post, click the pencil icon. The post will open in the editor tab to receive your corrections.
To publish a post, click the publish icon.
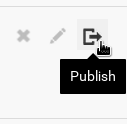
The post will be immediately published into the timeline.
Managing posts in the timeline
As we saw in the chapter What journalists see, the timeline in the journalist's view of Live Blog is very similar to the timeline that's published on your website.
The main difference is the addition of controls in the top right corner of each post. The first two are familiar enough.
Click the cross if you want to delete the post. You will be asked to confirm.
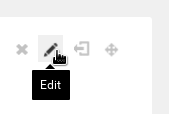
Click the pencil if you want to edit the post. It will be removed from the timeline and opened in the editor tab.
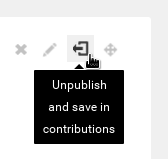
The unpublish icon, logically enough, has the arrow pointing back towards the left pane. Click it if you would like to remove the post from the timeline and relocate it to the Contributions tab.
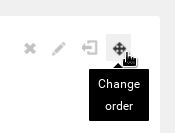
By default, posts are shown in the order which they were published into the timeline. Occasionally you might like to rearrange the order of posts.
To do that, click the cross-shaped change order icon on the post that you would like to move.
The post becomes outlined in blue, and a CANCEL button appears at the top of the timeline, in case you change your mind.
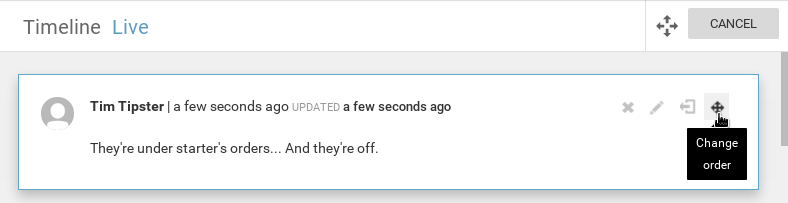
Now scroll down the timeline. As you scroll down, in between each post a rectangle will appear containing the words Click to place the post here.
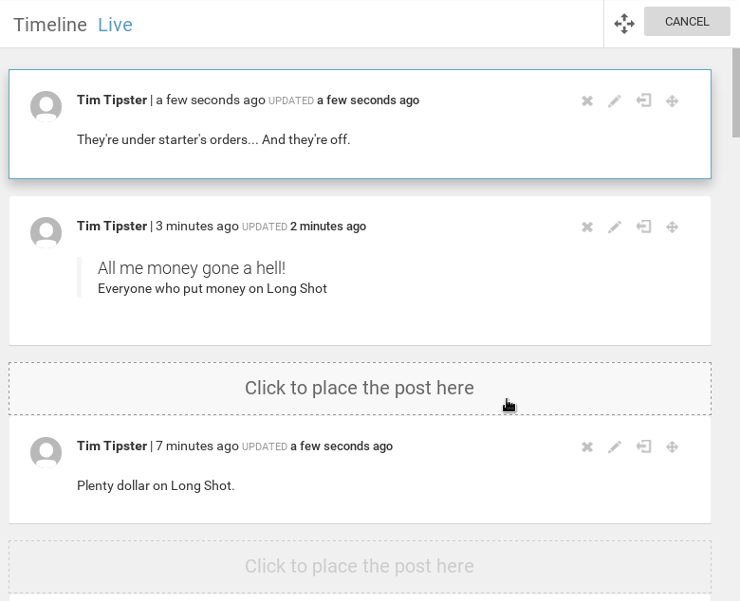
Click at the location you'd like the post to be moved to, and it will be moved there instantly.
That concludes our introduction to Live Blog. We at Sourcefabric would be pleased to hear your feedback. Details of how to do this, and of other sources of help, are in the appendix, in the chapter Getting help.