Newscoop 4.2 for Journalists and Editors
The sidebar
On the right side of the editing area is a vertical Sidebar containing further options for the new article, in a series of boxes. (If your computer's display is very small, the Sidebar may appear at the lower end of the page). Like the Comments box beneath the editing area, many of the boxes in the Sidebar can be minimized by clicking on the blue link in the box name.
Article types other than "news" may contain different boxes from those shown below. Whenever you edit any of the fields in the boxes, you will need to click either the Save All button at the top of the edit area, or any of the Save buttons in individual boxes.
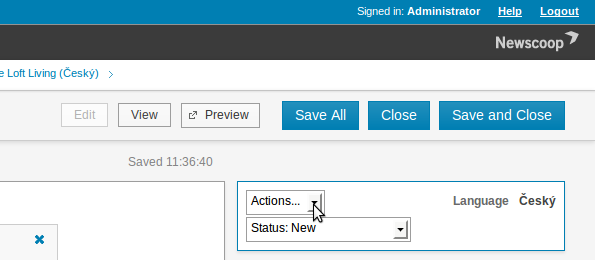
The Actions menu
The Actions menu contains short-cuts to commonly used functions:
- Unlock: When you begin editing an article, you automatically "lock" it to prevent conflicting edits from other users on the server. Using the Unlock action means that other authorized users can edit the article again. This action puts the article into View mode. If no other staff user has locked the article, you can click the Edit button to resume editing.
- Delete: Removes the article permanently from the Newscoop server.
- Duplicate: Copies the article to any publication, issue, or section on the same Newscoop server.
- Translate: Creates a new copy of the article for translation into another language.
- Move: Moves the article to another publication, issue or section on the same Newscoop server.
The Status menu
The Status drop-down menu indicates the copy flow state of the article. There are four states that the article can be in:
- New: The article is still being written. Once the contributors are ready for the article to be seen by the editorial team, they should change the status to "Submitted".
- Submitted: The article is under review by the editor or editors. Once the editors decide that the article is ready for the public to see, the status should be changed to "Publish with issue", "Published", or scheduled for publication at a later date and time.
- Publish with issue: The article will be published when the issue it belongs to is published. This action is only visible if the issue in question has not yet been published.
- Published: The article belongs to a published issue, and is now viewable by the public.
The Language menu
The Language menu is to the right of the Actions and Status menus. If multiple languages have been configured for the publication, a drop-down menu will enable switching between translated versions of the article. If not, the language of the article will be displayed here.
Publish Schedule
This box enables you to schedule the article to be published, unpublished, promoted or demoted at a certain date and time. It is only visible if the article has the status Publish with Issue or Published. Click the Add Event button to open a window with a calendar and publishing options, such as showing the article on its section page, or the publication's front page, at the specified time.
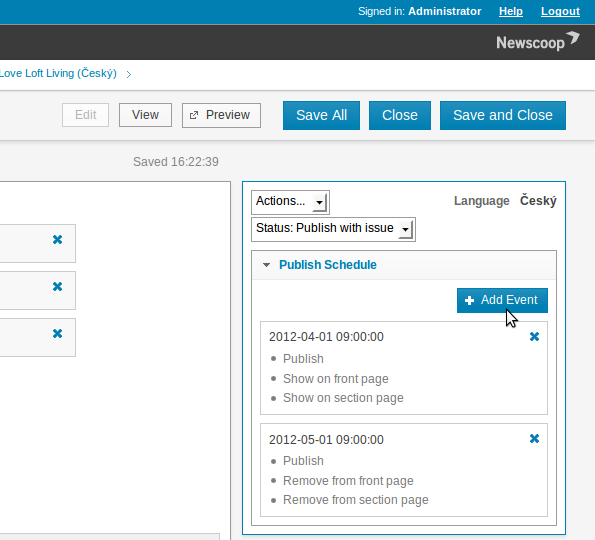
Note that the date fields have a fixed syntax of YYYY-MM-DD (four year digits, two month digits and two day digits, in that order). If you enter dates manually in any other format, you may get incorrect results.
Geolocation
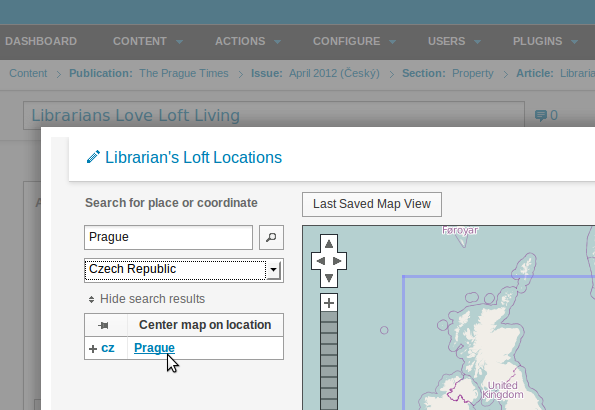
Clicking the Add button in the Geolocation box opens a pop-up window which enables you to set points of interest (map references) for the article. Points of interest from multiple articles can be displayed on a single map by your Newscoop templates.
First, enter a title for the map, and then search for a place name to centre the map on. Click the place name in the search results to centre the map on that location. Then use the vertical control on the left side of the map, with plus and minus buttons, to zoom in to an appropriate scale.
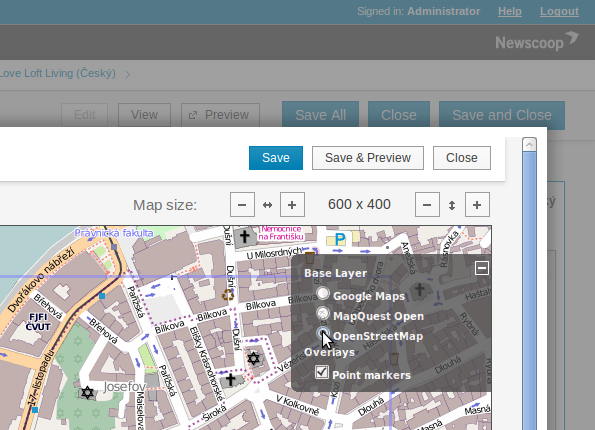
On the right side of the pop-up window, set the horizontal and vertical size of the map using the plus and minus buttons, and choose a base layer from the available mapping providers.
You can now add points of interest to the map by clicking on places, and entering names and descriptions for them.

Click on the Edit link to enter more details about the point of interest in a pop-up window, including external URL, image and video links. You can also change the colour of the point marker in the pop-up window.
Keywords & Topics
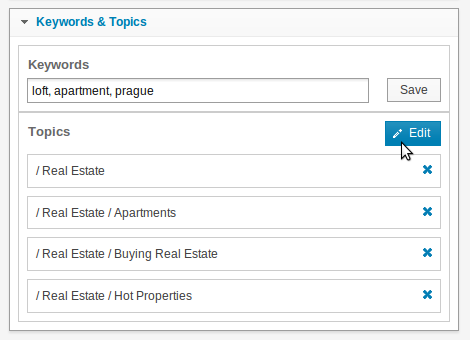
Click in the Keywords field to enter words that describe your article to search engines, then click the Save button. In the Topics box, click the Edit button to select from a list of topics and subtopics in a pop-up window. Topics allow you to set attributes for the article, which may be used to display the article in a certain way.
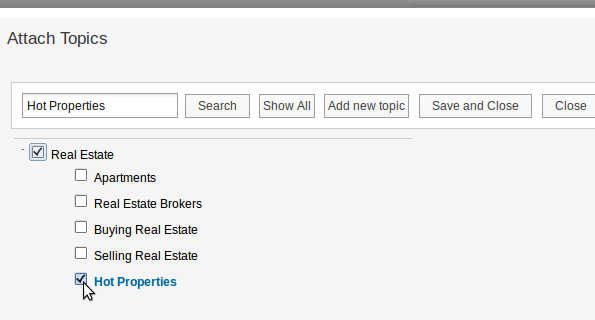
If the topics already created by your Newscoop administrator are insufficient to describe the article, you can click the Add new topic button. New topics that you create should be categorised with a parent topic, if appropriate, and the language of the topic phrase.
After clicking the Save and Close button, the Topics you have selected are displayed in the Keywords & Topics box in the sidebar. Click the blue x icon on the right side of each row to remove a topic from the table.
See the chapter Topics to find out how topics are categorized.
Switches
Switches enable the contributor or editor to activate certain Newscoop features.
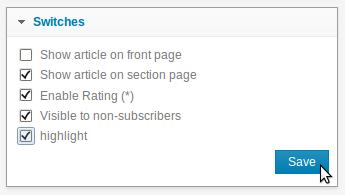
The switches for the default Article Type of 'news' are:
- Show article on front page: Check this box if you want the article to be displayed on your publication's front page for that issue. This setting is independent of the corresponding setting in the Publish Schedule box. If you wish the article to appear on the front page at a specific time other than the issue publication time, leave this box unchecked and add an event to the Publish Schedule.
- Show article on section page: Check this box if you would like the article to be displayed on the relevant section page. Also independent of the corresponding setting in the Publish Schedule box.
- Enable Rating: Check this box if you wish logged-in readers to be able to rate this article. The New Custodian theme includes an example five-star rating widget.
- Visible to non-subscribers: Check this box if you want to make the article visible to readers who have not yet subscribed.
- highlight: A custom switch which enables a news article to be highlighted for readers.
Info
The Info box displays general information about the article.
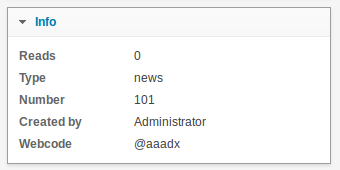
- Reads: A number indicating the popularity of this particular article. An article which has not yet been published will display N/A here.
- Type: Refers to the Article Type, the format of the article. You cannot change this field once it has been assigned.
- Number: The article's unique identification number on the Newscoop server.
- Created by: the name of the Newscoop user who created this article. You cannot change this field.
- Webcode: A unique code intended to help readers find the article online. Webcodes can be displayed as part of a corresponding article in a print publication.
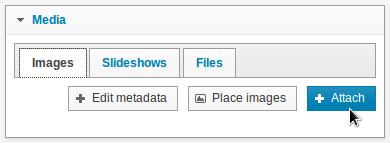
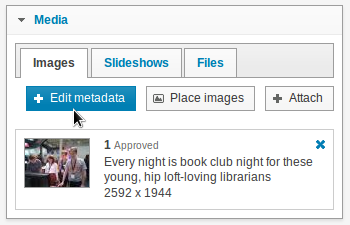
Images
The Media box has three tabs: Images, Slideshows and Files. On the Images tab, click the Attach button to select an image to go with the article.
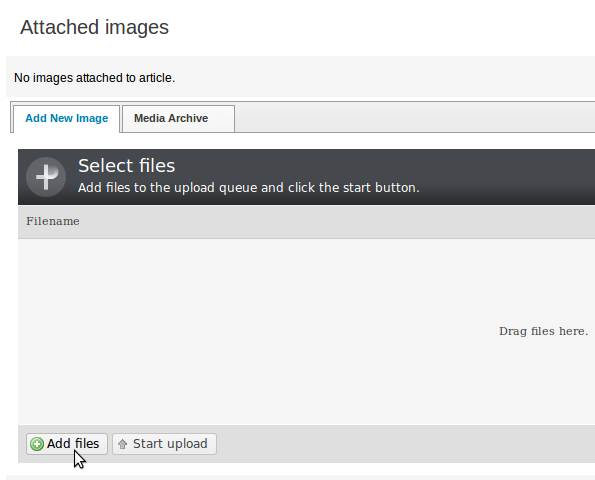
This action opens a pop-up window with a tab Add New Image, which you can use to upload images from your computer. This tab supports drag and drop if your browser is recent enough, such as Mozilla Firefox version 3.6 or later.
The image you are uploading must have the minimum number of pixels for the smallest rendition used in your publication, in order to maintain quality. The image rendering feature of Newscoop means that the same image can be used at various crop sizes, in different parts of your publication's theme templates, without having to be resized manually. See the chapter Image Rendering for more details.
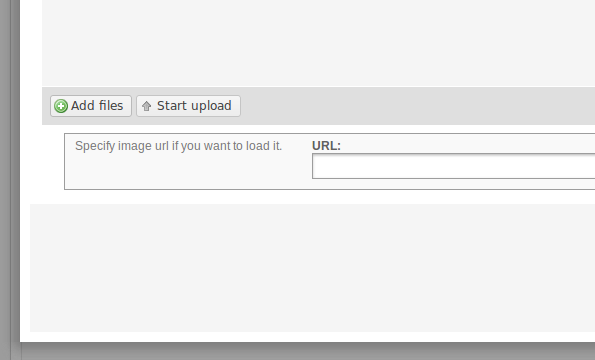
Alternatively, you can specify the URL of an image on another web server. This feature is useful for linking to a frequently updated image, such as the output from a webcam, which is published at a consistent URL. Of course, you should make sure that any external image used in your Newscoop publication does not breach the copyright of the photographer.
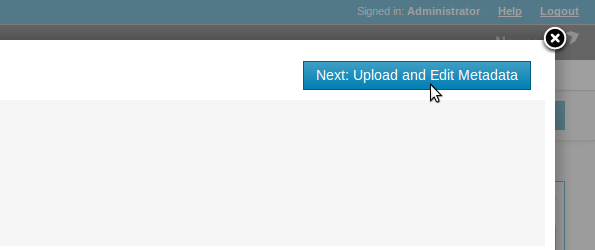
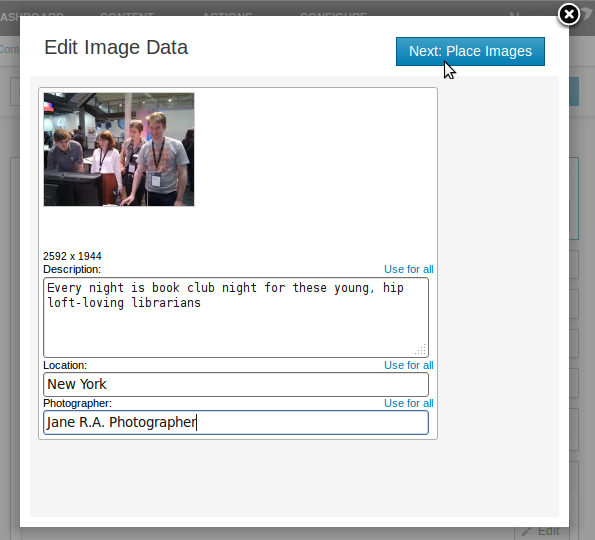
Then click the button Next: Upload and edit metadata in the upper right corner to enter details of the image.
This action opens the Edit Image Data box with fields for Description, Location and Photographer. You must enter some text in at least one of these fields to continue. This metadata will help you and your publication staff to find these images later. Then click the Next: Place Images button.
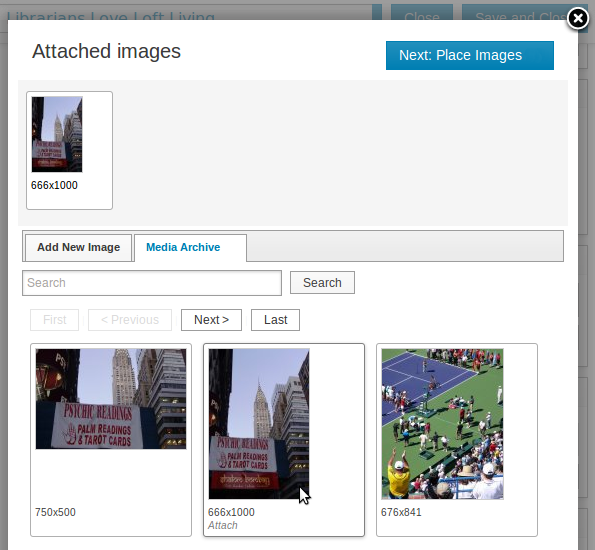
Another tab in the pop-up window enables you to attach an existing image from the Media Archive. There is a Search box for searching the text metadata of these existing images, such as location or photographer names.
Whether you have uploaded a new image or selected one from the archive, clicking the Place Images button opens a window in which you can preview the image renditions set for this publication, such as a 600 by 450 pixel crop.
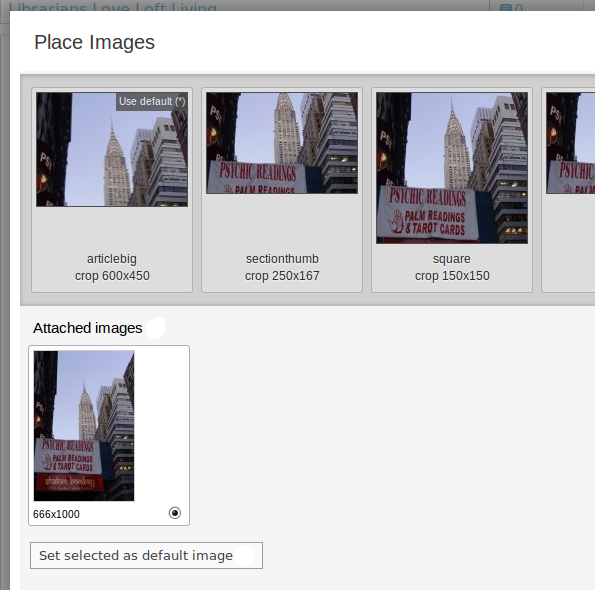
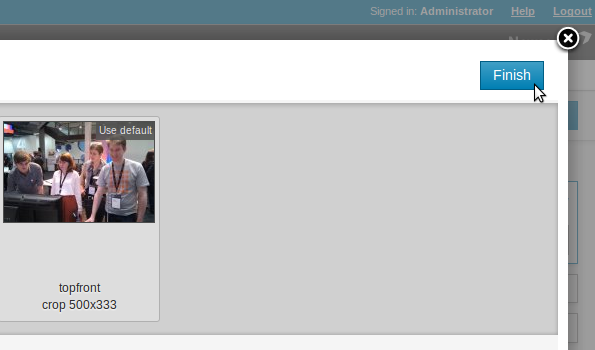
Click on the radio button underneath the original image on the lower row, then click Set selected as default image to change the default image for the article. When multiple images are attached to the article, you can drag and drop alternative images to the upper row. This changes the image used for a particular rendition. To return to the default image for the rendition, click Use default in the upper right corner of each rendition.
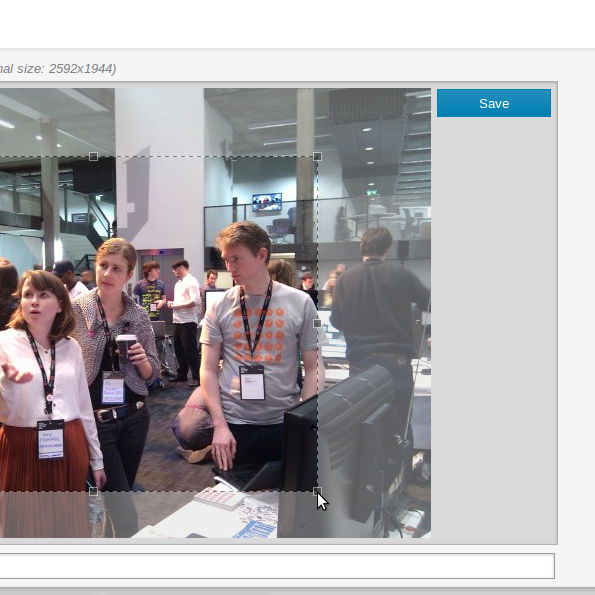
You can adjust the cropping of an image rendition by double-clicking on it. A crop box will appear over the full-size image. Use your mouse to move and resize the crop box to your satisfaction, and then click the Save button. When you have finished adjusting the cropping of all the image renditions, click the Done editing button.
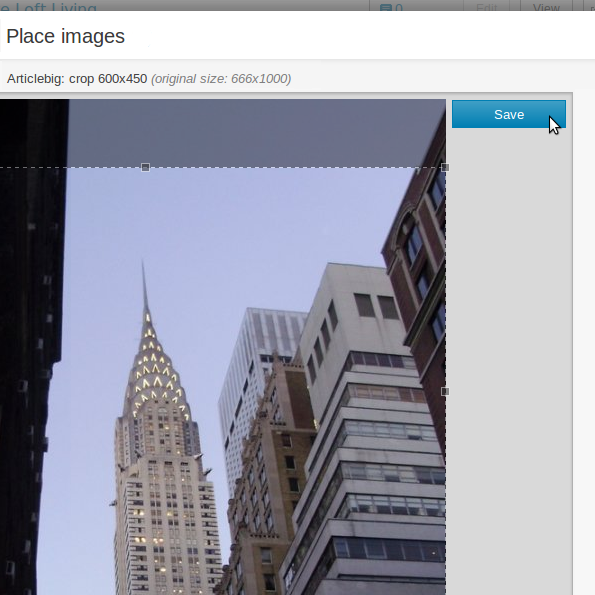
Finally, click the Finish button in the upper right corner to return to the Article Edit page.
Captions can be edited later by clicking the Edit Metadata button, which opens the Edit Image Data box.
Should rich text captions be enabled (see the chapter System preferences), click in the Description box to open a WYSIWYG editor toolbar which enables you to add formatting to the image caption. Click the small x icon in the upper right corner of the toolbar to close it.

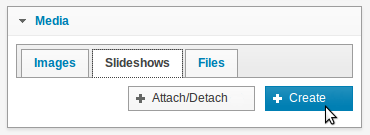
Slideshows
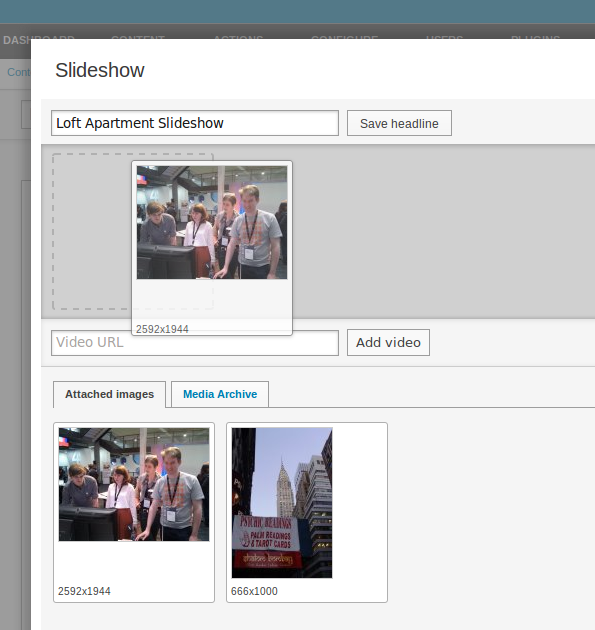
If you have a selection of images to illustrate your article, you can use the Slideshow tab to create an article gallery. This will be displayed as a series of thumbnails on which the reader can click to view your images full-size. To create a new slideshow, click on the Slideshow tab, then the Create button.
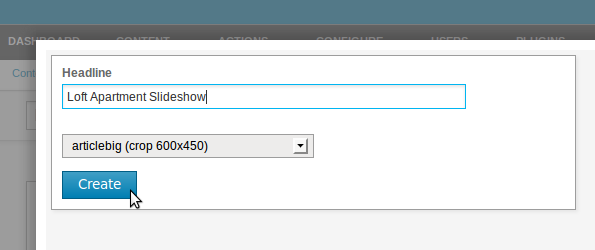
In the pop-up window which opens, enter a Headline for the slideshow, and select a rendition size from the drop-down window. Then click the Create button.
Next, drag and drop your choice of images for the slideshow from either the Attached Images tab or Media Archive tab. You can also add an online video URL to the slideshow by clicking the Add video button.
Click any image in the slideshow row to edit its caption, in the field below the image.
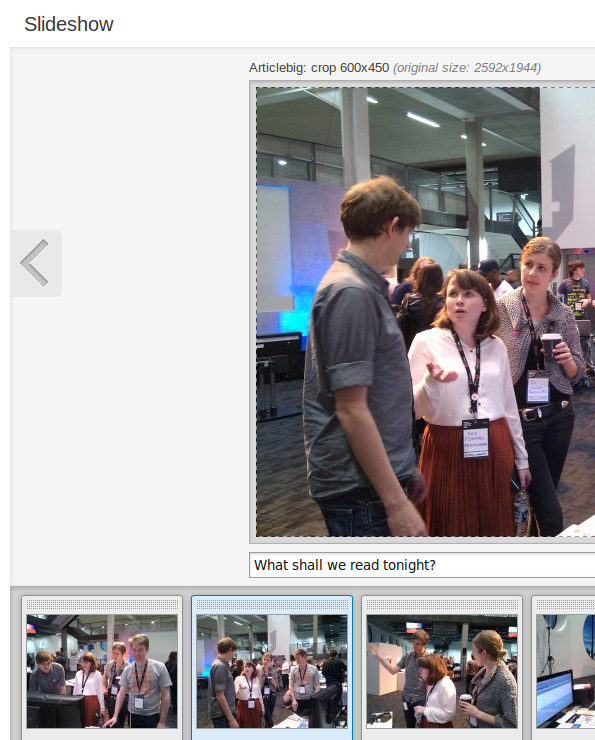
The cropping for any image in the slideshow can also be adjusted in this pop-up window. Once you've finalised the caption and cropping, click the Save button to the right of the image.
The updated captions and crops should now be shown in the Slideshow window.
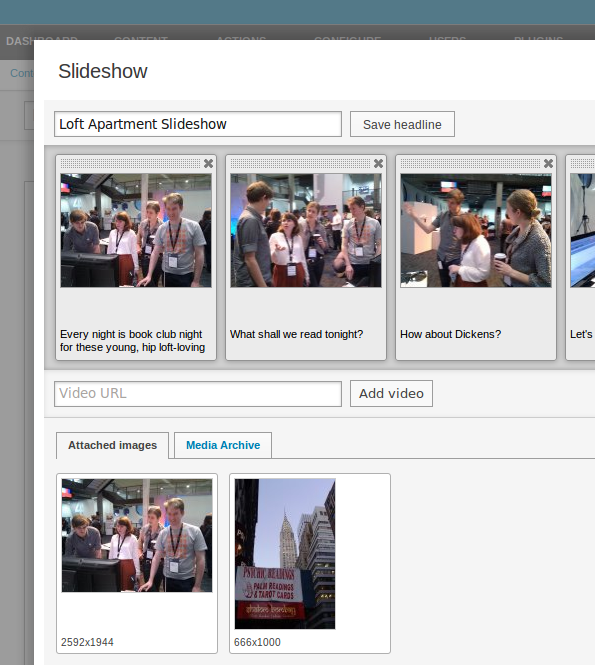
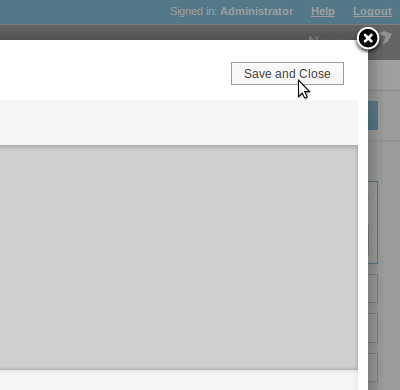
You can now return to the Edit Article page by clicking the Save and Close button in the upper right corner.
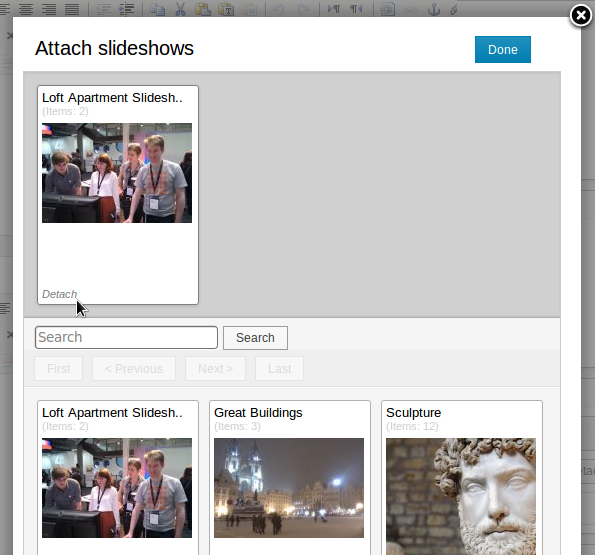
To edit the slideshow later, click on its name in the Slideshows tab of the Media box. Existing slideshows can be attached or detached from the article being edited by clicking the Attach/Detach button. This action opens the Attach slideshows box.
Files
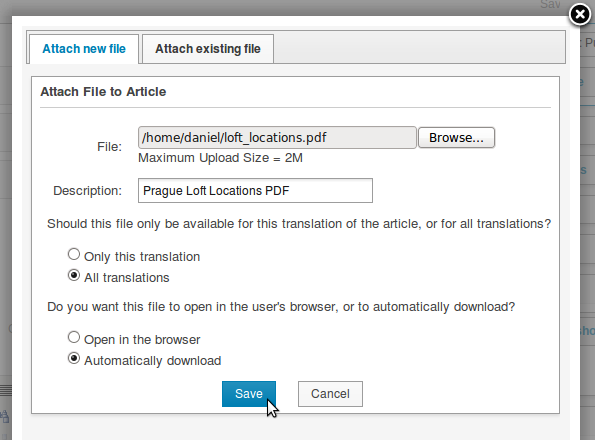
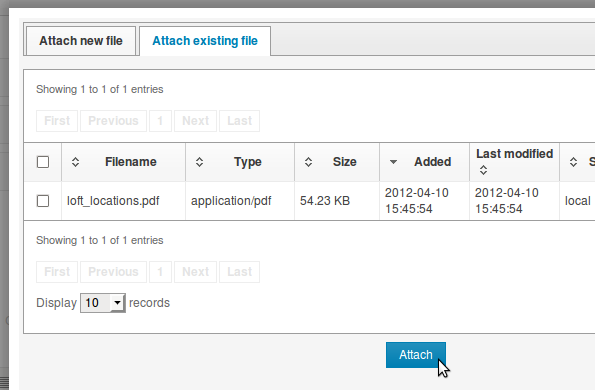
You can attach any kind of file you wish to an article. The article template must be set up to display these files, if readers are to have access to them. To begin, click the Attach button in the Files tab of the Media box. The pop-up window which opens has two tabs, Attach new file and Attach existing file. To attach a new file, click the Browse button in the first tab to select a file from your computer.

Enter a Description for the file, and optionally click the radio buttons to set translation and download options. Then click the Save button.
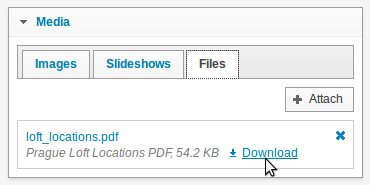
The attached filename will now be displayed in the Files tab of the Media box, with its description, format, size and a download link. To remove the file from the article, click the blue x icon in its row.
Files that have been uploaded to the Newscoop server remain available in the Attach existing file tab, even if they are not presently attached to an article.
Related Articles
Clicking the Edit button in the Related Articles box enables you to create a list of other relevant articles using a drag and drop interface. On the left side, click the Filter link to select a publication, issue and section to search from the drop-down menus. The final drop-down menu enables you to filter by other criteria, including Author or Language.
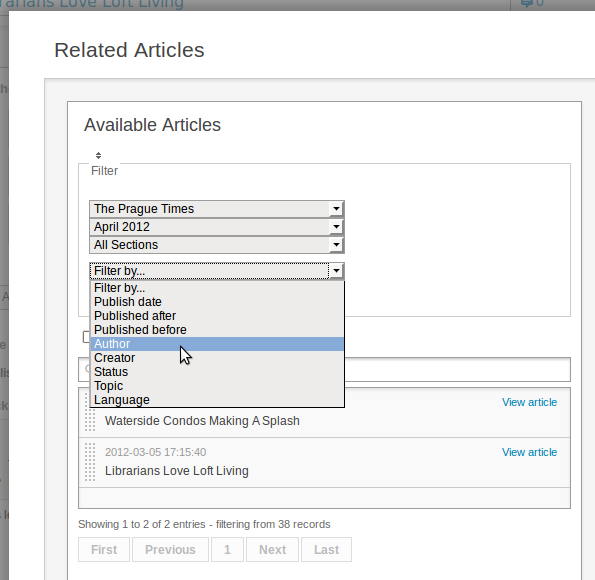
Check the Display Newswires box to show matches from agency feeds. There is also a field for text searches on article content, which has a magnifying glass icon. Search results are shown in the table beneath.
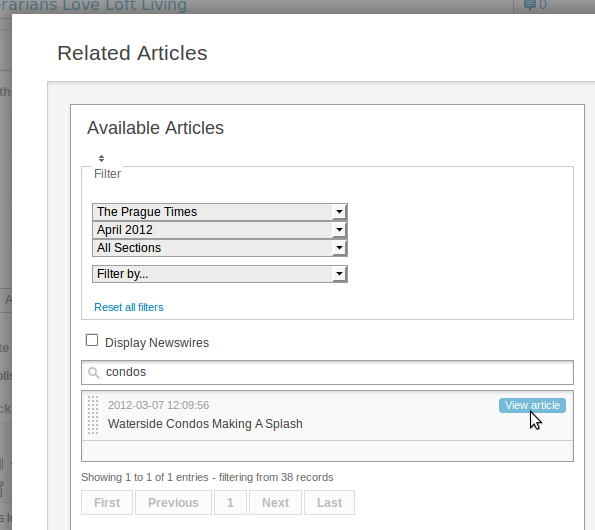
Click the View article link to preview the content of a search result on the right side of the pop-up window, then click the Close button to return to the Related Articles list.
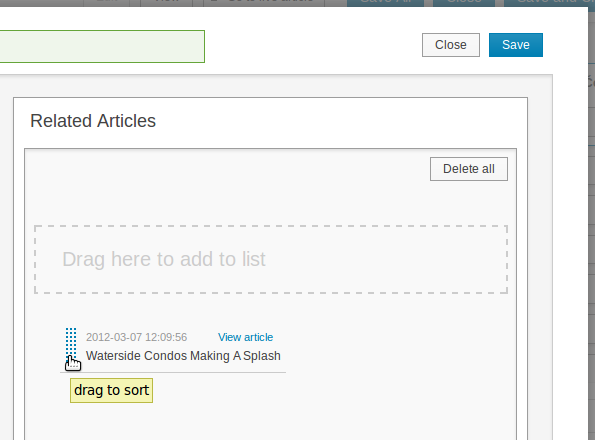
When you have decided on a related article in the search results, drag and drop it into the Related Articles list on the right side of the pop-up window. Items in the list can be dragged to sort them into a new order. Then click the Save button. When the list is complete, click the Close button to return to the Edit Article page.
Featured Article Lists
A Featured Article List is a custom article list created for a specific purpose. For example, it could be used in a particular page template to display a mixture of articles from different sections. To add the current article to a specific list, click the Edit button in the Featured Article Lists box. This action will open a pop-up window with a drop-down list of available featured article lists.
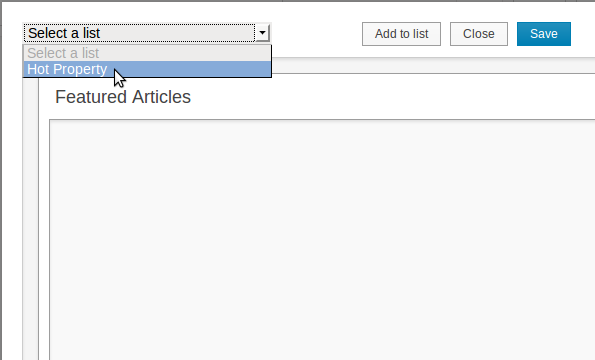
Click the Add to list button to add the current article to this specific featured article list. Drag and drop the articles in the list to change the ordering, if you wish, then click the Save button.
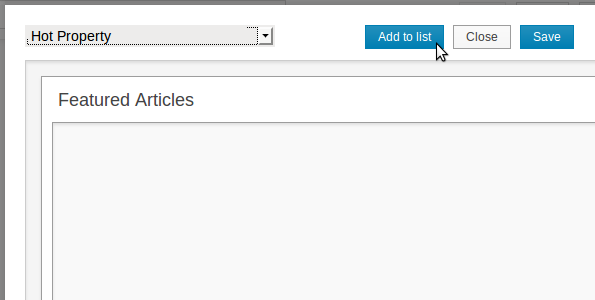
Finally, click the Close button to return to the article page. The names of the lists which the article is part of, if any, will be shown in the Featured Article List box. To create a new Featured Article List, see the chapter Managing content.
Multi date events
If a Complex Date field is part of the Article Type for the article you are editing, you will see a Multi date events box in the Sidebar. See the chapter Article Types for details of how to add this type of field. 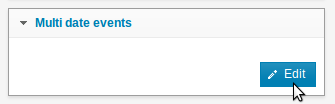
Clicking the Edit button in this box opens a Multi date events pop-up window. This window enables you to set dates and times for events by clicking on the rectangular fields in the top-left corner, marked with calendar and clock icons.
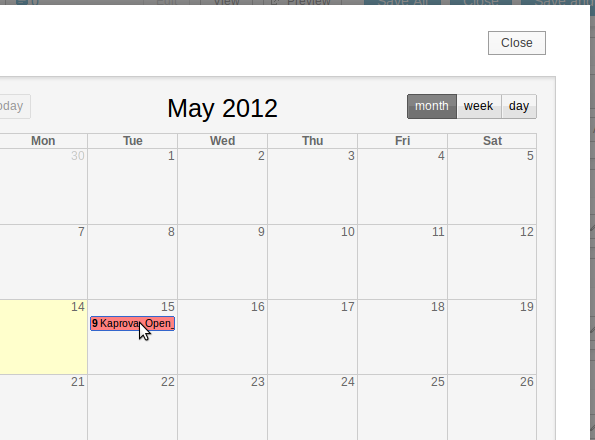
For an event on a specific date, click one of the radio buttons for Start time, Start & end time, or All day, and select the relevant Complex Date from the drop-down menu beneath. In this example, the Complex Date refers to an open house viewing event which is expected to happen on several different days, and is part of a custom Article Type used in the Property section of the publication. These dates and times can then be displayed as part of an article about the property for sale, in a special treatment devised by your theme designer.
If you click Start & end time an extra field will appear for the end time, while All day events do not have a start time. For a regular event, you can click the Recurring button, and select daily, weekly or monthly repeats. Enter a text comment if you wish, then click the blue Save button.
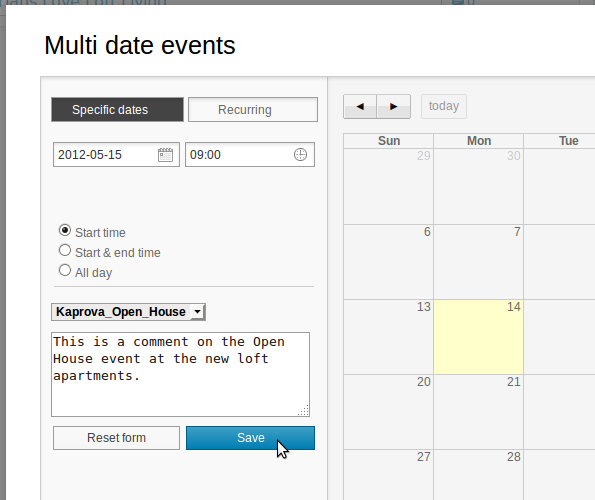
The event will now be shown in the calendar to the right side of the pop-up window. It will also be shown to readers of the published article, if your publication's theme supports the feature. Clicking on an event in the calendar enables you to edit it.
Click the Close button in the upper right corner of the pop-up window to return to the Edit Article page.
Plugins
At the lower end of the sidebar, you may see additional boxes related to Newscoop plugins that your system administrator has installed. See the chapter Using plugins for more details.